
Owner Resources
Helpful Hints
Frequently asked questions, installation instructions, and maintenance tips for your Acorn Deck House home.
Our Parts & Service Department has compiled answers to the most common questions we receive from homeowners. Select a topic below to expand the full details, download related guides, or watch instructional videos.
Balcony Decking
Decking, like other wood products, can have what is called mill glaze. This is when the blades cutting and shaping the boards seal the cells of the wood. This may not allow stain to penetrate the cells of the wood, so the stain will only sit on the surface. To help your decking last longer we strongly recommend cutting the decking to size, sanding all four sides (top, bottom and sides) with 80 grit paper, sealing the boards including the beveled cut ends and then installing the new boards.
Any piece of wood, especially on the exterior can check (check = crack, the exterior and interior of the wood absorbing moisture and drying at different rates). Keeping up with sealing the decking as needed will help reduce checking of the deck.
The deck beams are generally 8’ on center, but there have been bays at 8’6”. Before ordering, please verify the length of each section. Each deck board should be nailed with a horizontal 8” nail within 3-4” of each end of each board and about 3’ O.C. throughout the deck. Place a butyl based tape over the beams, then a painted aluminum beam cap, another layer of tape then the decking (tape and flashing not supplied by Deck House).
Customer quote about Sikkens: “We just finished sanding and staining the huge lower level of the deck off our kitchen; upper level we did last Fall. Can’t say enough about Sikkens Cetol SRD, the professional version. Demanding prep but then you’re home free.”
Condensation
The information below gathered from the internet should help if there is an issue with condensation. See links on condensation articles below.
Things that add humidity: Uncovered ground in crawlspaces, indoor plants, laundry hung out to dry, cooking activities, aquariums, humidifiers, hot tub, shower, indoor pool, etc. all add water vapor to the air. Add to this the natural humidity that Mother Nature contributes to the air all around us and you can see that humidity is a very common thing.
Water is forming on your new windows because one of several things is happening. The temperature of the inner glass surface is at or below the dew point for the amount of humidity in your inside air. The humidity of your indoor air is quite possibly much higher now with your new windows because the air leaks around your old windows were eliminated once the new windows were installed.
If you discover that your indoor humidity is not too high using your hygrometer, then you can minimize or eliminate the condensation by creating air movement around the windows. Just as blowing air dries say laundry things outdoors, air blowing over the interior glass will act just like the defroster does in your automobile.
Source: Ask The Builder
David Bareuther, Associated Press Building editor, sums up the problem of reducing humidity by saying there are only three ways to reduce humidity:
- CONTROLLING SOURCES OF HUMIDITY: For instance, venting all gas burners, clothes dryers, etc., to the outdoors. Use of kitchen or bathroom exhaust fans.
- WINTER VENTILATION: Because outside air usually contains less water vapor, it will “dilute” the humidity of inside air. This takes place automatically in older houses through constant infiltration of outside air.
- HEAT: The process of heating your home will reduce the relative humidity, providing its dry heat. It will counter-balance most of all the moisture produced by modern living.
Now before we summarize specific steps for reducing humidity in your home, let’s include some basic data about recommended moisture. You can refer to it if you are inclined to test the moisture levels in your own home. The table below is the result of long and careful experiments at the University of Minnesota Engineering laboratories. It shows the maximum safe humidities for your home, not only for the windows, but even more for your paint, insulation, and structural members. In most cases, reducing moisture to these humidities will cure troublesome condensation on windows; if not, you can reduce humidity further without discomfort to you or your family.
If you test humidity in your home, be sure to use an accurate instrument, preferably a good sling psychrometer. Remember, too, that these relative humidities are for 70 degrees F. For higher temperatures, lower humidities are required.
| Outside Air Temperature | Inside Relative Humidity for 70°F Indoor Air Temperature |
|---|---|
| -30°F or below | Not over 15% |
| -20°F to -10°F | Not over 20% |
| -10°F to 0°F | Not over 25% |
| 0°F to 10°F | Not over 30% |
| 10°F to 20°F | Not over 35% |
| 20°F to 40°F | Not over 40% |
Seven Practical Steps to Control Condensation
Here, arranged from easy to more difficult, are the steps you should take to reduce condensation on your windows.
- Install replacement windows with double glazing.
- Shut off the furnace humidifier and any other humidifying devices in your home.
- Be sure that louvers in attic or basement crawl spaces are open and that they are large enough.
- Run the kitchen or other ventilating fans longer and more often than has been your custom.
- Open the fireplace damper to allow easier escape for moisture.
- Air out your house a few minutes each day. Air out kitchen, laundry and bathrooms during use or just following use.
- If troublesome condensation persists, see your heating contractor about an outside air intake for your furnace; about venting of gas-burning heaters and appliances; or about installation of ventilating fans.
If the common remedies we suggest (number 1 through 5) don’t work, you REALLY have a condensation problem. But the changes your heating contractor may recommend to further reduce humidity in your home should not be very expensive. Certainly they will be less expensive than a big paint job caused by excessive water vapor.
Glass
Today, every Acorn Deck House glass product comes standard with argon-filled, low-e coated Solarban® 60 insulated glass. Our sliding glass doors, sliding windows and fixed glass windows have two layers of 3/16” glass with a 1/2” spacer; our casements and awnings have two layers of 1/8” glass with a 1/2” spacer; and our mahogany entry doors have two layers of 3/16” glass with a 3/8” spacer. Our insulated glass units have u-values as low as .25. Triple-pane glass units can also be quoted upon request and feature three layers of 3/16” glass with two 1/2” spacers. Custom glazing and spacer options are also available. Please call for details.
How to Measure for Deck House Replacement Glass:
The best way to measure a window is from the exterior. We recommend having a builder or professional measure if you are unsure of the size.
Standard glass for us is 7/8 thick, low-e coating with a bronze spacer
Let us know if you need anything different, like thinner glass. Be sure to identify if glass needs to be tempered, obscure, etc.
- From exterior (rectangle or square), the glass size equals frame size as listed below minus ¼”.
- Measure from inside of frame to inside of frame (where the stop bead meets the frame). Measure left to right in three places: left – middle – right. Give us the smallest of the three numbers minus ¼”, which is the glass size. Follow the same for the height: top – middle – bottom.
To determine the glass size of a triangle, from the exterior:
- Identify if the high side from the exterior is on the right side or left side of the glass
- Measure the width the same way as above (minus ¼”)
- Measure and identify the high side to the very point on the inside of frame minus 5/16” overall
- Measure and identify the low side on the inside of frame minus 3/16” overall
- Be sure to identify if any piece of glass needs to be tempered or obscure
- If several pieces, it may help to label each piece (example: 35 x 25 living room, lower right)
To determine the glass size of a rectangle, from the interior:
- Measuring the inside of frame to inside of frame if with a window sill:
- If the jamb measures 1-1/2” the you add 1” to the visible glass size
- If the jamb measures 1-1/4” the you add 3/4” to the visible glass size
Pressure Washing
Be careful pressure washing. If you are too close or if the pressure is too high, you may damage the product. If you are pressure washing the siding or overhangs, have someone inside while this is being done. We have heard of water coming in where the roof decking meets the wall at the eaves or rake.
We have had other owners and builders tell us that TSP and bleach mixed with water works. We recommend calling the manufacturer of what you plan on using for a stain for prepping recommendations.
We have owners and builders who swear by Sikkens. Below is from an Olympic representative on interior stain, but it generally applies to exterior stains as well. Both Sikkens and Olympic are owned by PPG Coatings:
The stain composition has changed over the years and along with natural weathering and age, there isn’t going to be any way to guarantee an exact match. The formulations/blending that Deck House did again are unique to your homes and something that most retail customers wouldn’t necessarily duplicate due to the intermixing done. You are on the East Coast which has been impacted by the VOC regulations and the alkyd/linseed oil based stains are no longer able to be purchased or sold in MA or MD. The color # 708 and 730 are still able to be tinted, but are no longer package colors. The stains are a “hybrid formula” now, Maximum acrylic/oil, and apply a bit differently and will not look the same as the older oil base stains from the 80s. The best suggestion I make for you to better service your customers is to rematch the newer formulation Maximum to the older linseed oil base stain formulas you created, using your mixing ratios as a starting point. The tint base for the Maximum is product code 79550 and can be used a clear blending agent as well to “soften” the color.
Before washing and sealing the house you may want to take a look at your weather strip around the sash. They most likely need to be replaced. If they are not replaced, they may let water in while washing the house.
Roof & Insulation
In the Northern half of the United States, today’s code (differs from town to town) requires an R-value of 49 (if stretch code), which is 8” of Dow Tough-R or Thermax foil faced both sides if local code calls for staggered joints in both directions.
- We do not recommend venting a 3-pitch properly-insulated Deck House roof.
- Keep in mind wires run between the roof decking and the insulation.
- We do not recommend SIPS (Structurally Insulated Panels) generally less of an R-value per inch than Dow Tough-R and could leave gaps or channels where air can travel causing condensation issues (banned in Canada).
There are builders/roofers who will only roof a 3-pitch roof if they:
- Cover the entire roof in a waterproof underlayment.
- Replace the old skylights with new skylights.
- Take down the chimney to the roof and rebuild it back up. The reason for this is that many houses in the past used brick or very porous brick, which can cause problems, or the old pan flash needs to be replaced.
We use GAF/ELK TIMBERLINE PRESTIQUE Lifetime HD Ultra (4ea pr SQ).
From Polyiso.org:
- Multi-layering of Polyiso roof insulation installed with staggered joints offers a number of advantages, including:
- Reduced thermal loss at insulation joints
- Reduced thermal bridging
- Reduced moisture migration from the building interior into the roofing system
- Reduced potential for membrane splitting in Built Up Roofing (BUR) systems
- Typically the fasteners for roof sheathing (OSB or Plywood) are insulation plus 2”.
- If the roof has been modified, please double check the faster size before installing. If they are too short, the fastener will not go into the roof decking to hold the roofing correctly; if they are too long, the fasteners will go through the decking into the home, wrecking the ceiling.
- The roof decking has changed slightly through the years (different thicknesses and widths) and today’s standard is 5-1/4” wide x 2-1/4” thick. The best way to tell the thickness of the insulation is (if original):
- .75” fascia overhang + 2.25” for roof decking (+/- depending on year) + .5” plywood (if after 1982) + .375” for shingles = 3-7/8”
- If 1” of insulation, then the roof should measure 4-3/8” from bottom of fascia to top of shingles (if one layer and no Plywood and no venting)
- If 2” of insulation, then the roof should measure 5-7/8” from bottom of fascia to top of shingles (if one layer and no venting)
- If 4” of insulation, then the roof should measure 7-7/8” from bottom of fascia to top of shingles (if one layer and no venting)
- If there is condensation appearing only at the peak, then it is possible that the roof insulation is not overlapping at the peak correctly.
Sash Operators
Replacing a Deck House Sash Operator
If your sash is not opening, usually the problem you are experiencing is with the “operator” (the part that the crank attaches to that opens the window) rather than the crank. If the crank is stripped, you will be able to open the window using light pressure to turn the stem of the operator (the area that the crank slips over). If the window does not open using this method, the operator shaft has most likely snapped. You should be able to replace the operator yourself if you are able to remove a few pieces of trim and a few screws.
Sliders
- Today’s Mahogany Sliding Glass Door is Energy Star rated
- The new MSGD frame matches window and door frames of any vintage Deck House unit
- The units are fully assembled solid mahogany sliding glass doors with screen and handle
- The glass has a low-e coating, thermal break spacer and is argon filled for energy efficiency
- Multiple locking system – more than one catch mechanism on the sliding door & jamb
- Secondary lock – slide bolt at top of slider for added security, also locks with door open 4” allowing air flow
- Stainless steel track cover – placed over the track to allow smooth operation over a longer period of time
- Self trimming (Interior) – self trimming frame, no interior trim required
- Closed ball bearing wheels – prevents dirt from collecting on the grease of the wheels & slowing it down
Installation Tips for MSGD:
- Seal all exposed mahogany on the unit as soon as possible inside and out before or after installing
- Exterior frame should be flush with exterior sheathing so trim or siding can trim out unit
- The jamb for a 2×4 wall is 5-1/8 +/- or for 2×6 walls 7-1/8 +/- from face of exterior frame to what looks to be interior trim
- Pan flash as needed with membrane tape running down the wall over house wrap at the bottom
- Shim-unit should be installed plumb, level and square
- Nail 12d finish or screw and plug through jamb and shims into framing
- Thin waterproof membrane tape sides over sheathing ¼” onto unit frame
- Thin waterproof membrane tape top over sheathing ¼” onto unit frame
- Insulated around unit
- Install ½ mahogany or drywall on the interior into the drywall groove
- Trim the exterior of the unit as needed, caulking behind the siding or trim where it over laps the frame by ½”
- Adjust operable units so they open, close and seal properly
Replacing MSGD Wheels
The following is the case if the wheels we have are adjustable from the interior face not the edge of the door (depending on the year).
To replace the wheels (we recommend replacing the roller channel as well):
- You will need two people
- With one strong person holding the weight of the door (about 130 lbs.), you will need to lower the door by removing the brown plastic plugs and turning the slot COUNTER CLOCKWISE with a slotted screwdriver
- If the door has not already cleared the top track, carefully lift the door and swing the bottom inward
- Place the door on a flat, stable surface being careful not to damage the handle
- Remove the two end caps from the roller channel by prying and pulling out nail (a clearish white plastic)
- Remove the gray, fuzzy weather-strip
- If replacing the roller channel, punch the center nail through the plastic
- Remove two screws for each of the rollers you are replacing
- If replacing, remove roller channel and replace new one after removing the weather-strip and nail in the center
- Screw in new rollers making sure the slotted side is facing toward the interior
- Predrill and nail in one of the end caps, replace the weather-strip and nail the other end cap
- Carefully place door back in position top first. **IMPORTANT** raise door back so that the top is within the track and the edge of the door lines up with the jamb so that it locks properly
1980s Weatherstrip Replacement Kit
We have a weather strip kit to help older sliders that may have moved or bowed over the years.
What it includes:
- A new, taller sill extension – a piece of mahogany that you step over at the operable slider with 4 screws and a piece of weather strip
- Exterior adjustable weather strip – a metal piece with a rubber insert that is placed against the sliding door on the exterior
- Weather strip extension – a piece of mahogany that is screwed to the fixed panel between the operable and fixed slider if one or both panels have bowed.
- Noting each slider separately (A, B, C or 1, 2, 3…), we would need:
- The handing of each unit – viewed from the exterior: if the handle of the unit is on the left, then it is a left hand unit; OR if the handle is on the right, then it is a right hand unit.
- A general width and height of each slider
- The distance between the fixed and operable slider at the top, middle and bottom of the each of the sliders. The measurement between the fixed and operable slider (may be about ¾”).
These parts can be ordered as a kit or as separate parts.
Home Improvements
Updating Windows & Doors
Updating your windows, sliders and doors is a great way to give your home a significant face-lift. Not only will this give your home more curb appeal, but it will also help save energy. Unlike the glass you may currently find in your home, the glass that we use is argon-filled, Solarban 60 with a low-e coating. This means that our windows, sliders and glass doors can keep your heat inside and the cold, wintry weather outside without sacrificing any of your current views.
Paint & Stain
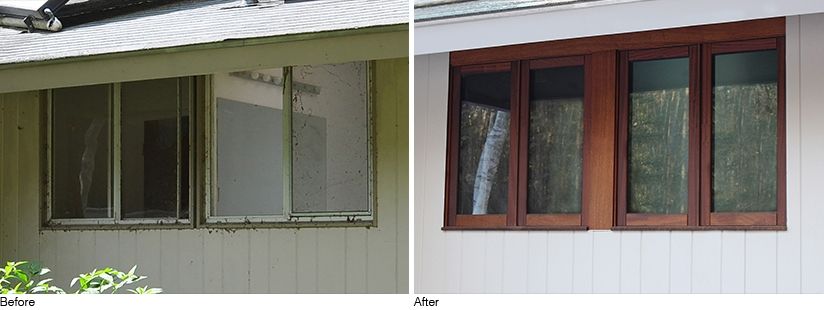
Simply maintaining your paint and stain can dramatically improve the appearance of your home. In addition, maintaining your paint and stain will also help ensure longevity of your home’s wood posts, beams, siding, trim, windows and doors.
Beam Wraps
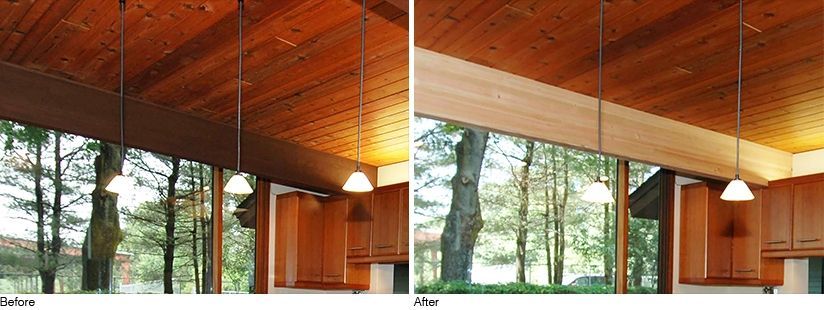
In older Deck Houses, it is very common for the beams to be stained a very dark brown color, which are nearly impossible to change without painting the beams and losing the natural woodgrain. Because of this, we developed beam wraps: an innovative way to lighten your beams and give your home a fresh look. They are essentially sections of unstained Douglas fir beams, stripped into pieces that cover the three exposed sides of your beams – creating a veneer around your original beams. Once the wrap is installed, it can be stained to your color preference.
Other Home Improvement Ideas
Interested in an Addition or Renovation?
